Food photography has a quiet kind of magic. A simple bowl of soup, a slice of cake, or a plate of roasted vegetables can suddenly feel warm, inviting, and full of story when photographed well. It is not only about making food look beautiful. It is about capturing the mood around it — the steam rising from fresh pasta, the crumb of homemade bread, the gloss on ripe berries, or the soft messiness of a table after brunch.
The good news is that you do not need a professional studio to take better food photos. Some of the most appealing food images are made with natural light, thoughtful styling, and a bit of patience. Whether you are photographing meals for a blog, social media, a personal recipe collection, or simply because you enjoy the creative process, a few practical Food Photography Tips can make a huge difference.
Great food photography starts before the camera clicks. It begins with noticing light, texture, color, and the small details that make a dish feel real.
Understand the Story Behind the Dish
Before taking a photo, pause for a moment and think about what the food is saying. A rustic apple pie should probably feel different from a clean, bright smoothie bowl. A cozy bowl of stew may need warmth and depth, while a summer salad might look best with airy light and fresh colors.
This simple idea helps guide every choice. The plate, background, props, angle, and lighting should all support the mood of the food. If the meal feels homemade and comforting, a slightly wrinkled linen napkin or wooden surface may work beautifully. If the dish is fresh and modern, a clean background and minimal props may be stronger.
Food photography becomes easier when you stop thinking only about the food as an object and start thinking about the scene around it. The goal is not perfection. It is connection.
Use Natural Light Whenever Possible
Light is one of the most important parts of food photography. Even an ordinary dish can look lovely in good light, while poor lighting can make beautiful food look flat, dull, or unappetizing.
Natural window light is often the easiest and most flattering option. A window with soft, indirect light can create gentle shadows and bring out texture without making the food look harsh. Morning or late afternoon light usually works especially well because it is softer and warmer than strong midday sun.
Direct sunlight can sometimes be dramatic, but it can also create sharp shadows and bright spots that distract from the food. If the light is too strong, a thin curtain, white cloth, or sheet of baking paper taped near the window can soften it. That small adjustment can completely change the image.
Try placing the food beside the window rather than directly in front of it. Side lighting adds depth and shape, especially for dishes with texture, such as pancakes, pasta, salads, pastries, and roasted vegetables.
Pay Attention to Shadows and Highlights
Food needs dimension. Without shadows, a photograph can look flat and lifeless. With too much shadow, the dish may feel heavy or unclear. The balance between light and dark is what gives food its shape.
If one side of the dish is too dark, use a white card, foam board, plate, or napkin to bounce light back toward the food. This is called a reflector, though it does not have to be fancy. Even a white notebook can help brighten shadows.
On the other hand, do not remove every shadow. A little contrast makes food look more natural. The folds in pasta, the cracks in bread crust, or the layers in a cake need shadow to show texture. The trick is to soften shadows enough that the food still looks inviting.
Highlights matter too. Shiny foods such as sauces, soups, glazed pastries, and fresh fruit often look best when the light catches them gently. That small glow can make the dish feel fresh and alive.
Choose the Right Angle for the Food
One of the most useful Food Photography Tips is to choose your camera angle based on the shape of the dish. Not every meal looks good from the same perspective.
Flat foods often photograph well from above. Think pizza, smoothie bowls, salads, charcuterie boards, cookies, or a table spread with several dishes. The overhead angle works because it shows arrangement, color, and pattern.
Tall foods usually look better from the side or at a three-quarter angle. Burgers, layered cakes, stacked pancakes, drinks, sandwiches, and parfaits need height to be visible. If photographed from above, their best details may disappear.
Bowls and plates with depth often work nicely at a 45-degree angle. This feels close to how someone sees food while sitting at a table. It can show both the top of the dish and the side details.
Take a few photos from different angles before deciding. Sometimes the best shot is not the one you expected.
Keep the Background Simple and Supportive
A background should help the food stand out, not fight for attention. Busy surfaces, bright patterns, or distracting objects can make the image feel cluttered. Simple backgrounds usually work better, especially for beginners.
Neutral surfaces such as wood, stone, linen, matte tiles, parchment paper, or plain tabletops often photograph beautifully. They add texture without stealing the focus. Soft colors like white, cream, gray, beige, muted blue, and pale green are easy to work with because they complement many types of food.
That said, simple does not mean boring. A rough wooden board can make bread feel rustic. A dark surface can make chocolate cake look rich and dramatic. A light marble or ceramic background can make fruit, salads, and breakfast dishes feel fresh.
The background should match the dish’s personality. A delicate dessert may need a softer setting, while grilled food or hearty soup can handle something more earthy.
Style the Food Without Making It Look Fake
Food styling is where a dish becomes camera-ready, but it should still look edible. Over-styled food can feel stiff, while natural styling makes the viewer feel like they could pick up a fork and take a bite.
Start by arranging the main food carefully. Wipe the edge of the plate if needed, but do not make everything too perfect. A little sauce drizzle, scattered herbs, crumbs, or a spoon resting nearby can make the scene feel lived-in.
Fresh garnishes can add color and freshness. A sprinkle of chopped parsley, a few sesame seeds, a twist of black pepper, or a squeeze of lemon can brighten a dish instantly. But use restraint. Too many garnishes can look forced.
For foods that dry out quickly, such as pancakes, meat alternatives, roasted vegetables, or pasta, photograph soon after preparing them. A light brush of oil or sauce can bring back shine, but the food should still look natural.
Use Color to Create Appetite Appeal
Color has a strong effect on food photography. A plate with only brown or beige tones can look flat unless it has strong texture and lighting. Adding contrast often makes the image more appealing.
Fresh herbs, sliced citrus, berries, chili flakes, colorful vegetables, sauces, or a bright napkin can bring energy to the frame. For example, a bowl of creamy soup looks warmer with a swirl of oil and green herbs. A plate of toast looks more inviting with red tomatoes or golden eggs. A chocolate dessert becomes more striking beside raspberries or a dusting of powdered sugar.
The colors do not need to be loud. Sometimes muted tones feel more elegant. What matters is harmony. The food should remain the star, while the supporting colors guide the eye toward it.
Think About Texture and Layers
Food photography becomes more interesting when texture is visible. Crisp edges, creamy sauces, flaky pastry, glossy fruit, crumbly cheese, toasted nuts, and soft noodles all give the viewer something to feel visually.
Layers also help. A stack of pancakes, a spoon cutting through cake, pasta twisted around a fork, or yogurt topped with granola and fruit can create depth. These details make the image more sensory.
If a dish looks too plain, add texture thoughtfully. A few seeds on soup, chopped nuts over oats, herbs on pasta, or coarse salt on roasted vegetables can change the whole photograph. Texture makes food feel real, and real food is usually more tempting than perfect food.
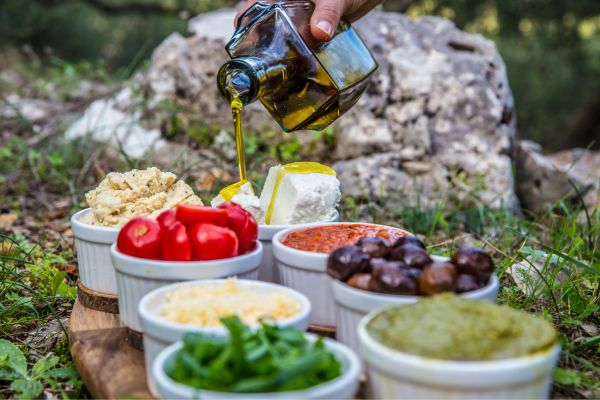
Create Movement and Human Warmth
Some of the most memorable food images include a sense of action. A hand pouring tea, syrup dripping over pancakes, steam rising from a bowl, someone breaking bread, or a spoon dipping into dessert can make the scene feel alive.
Human elements should be used naturally. A hand reaching for a slice of pizza or holding a cup can add warmth, but it should not feel staged in an awkward way. The goal is to suggest a moment, not create a performance.
Movement can also come from the food itself. A drizzle of sauce, scattered crumbs, a fork mark in cake, or a half-eaten cookie tells the viewer that the food is being enjoyed. This kind of imperfection often makes photos more relatable.
Use Props Carefully
Props can support a food photo, but they should never overpower the dish. Plates, bowls, cutlery, napkins, glasses, ingredients, herbs, and cooking tools can help tell the story, as long as they feel connected to the meal.
Choose props that match the mood. A rustic soup might look right with a wooden spoon and linen cloth. A fresh breakfast bowl may need a small spoon, a glass of juice, or scattered fruit. A pasta dish might work with parmesan, basil, and a simple fork.
Avoid filling the frame just because empty space feels uncomfortable. Negative space can be beautiful. It gives the food room to breathe and makes the photo easier to look at.
Focus on the Most Appetizing Detail
Every food photo needs a clear point of focus. It might be the glossy center of a tart, the melted cheese on a slice of pizza, the steam on noodles, or the crumbly edge of a brownie. Decide what matters most, then frame the image around that detail.
On a phone, tap the screen where you want the focus to land. On a camera, use a focus point carefully, especially when shooting close-up. If the wrong part of the image is sharp, the photo may feel slightly off even if everything else looks good.
Close-up shots can be powerful, but they need clarity. Let the viewer see texture, color, and freshness. A sharp, focused detail often feels more appetizing than a wide shot with too much going on.
Edit Gently and Keep the Food Looking Real
Editing can improve a food photo, but too much editing can make food look unnatural. Over-saturated colors, extreme contrast, or heavy filters may turn a fresh meal into something artificial.
A gentle edit is usually enough. Brighten the image slightly, adjust warmth if the photo looks too blue or too yellow, add a bit of contrast, and sharpen carefully. Whites should look clean, greens should look fresh, and food should still resemble the real dish.
Try not to change the color of food too dramatically. A tomato should still look like a tomato. Bread should not become orange. Salad leaves should not look neon. The best edits enhance what is already there rather than pretending the food was something else.
Practice With Everyday Meals
The fastest way to improve food photography is to practice with ordinary meals. You do not need a perfect cake or restaurant-style dish. A cup of coffee, a bowl of noodles, toast, fruit, soup, or leftovers can teach you about light, angles, composition, and color.
Take one dish and photograph it near a window. Try side light, then backlight. Shoot from above, then from the side. Add a napkin, then remove it. Change the plate. Move the food closer to the light, then farther away. These small experiments teach more than reading theory alone.
Over time, you start noticing what works. You will see how steam disappears quickly, how herbs brighten a plate, how white backgrounds reflect light, and how certain foods need close-up shots while others need space.
Conclusion: Let the Food Feel Alive
Good food photography is not only about sharp images or stylish plates. It is about making food feel alive, inviting, and connected to a real moment. The best photos often have warmth in them — a little shadow, a bit of texture, a natural crumb, a soft spill of sauce, or the quiet suggestion that someone is about to sit down and eat.
These Food Photography Tips can help you build stronger images, but the real skill comes from slowing down and paying attention. Notice the light. Respect the shape of the dish. Let colors and textures do their work. Keep the scene simple, but not empty. Most of all, photograph food in a way that makes it feel worth tasting.
When a photo captures not just how a meal looks, but how it might smell, feel, and taste, that is when food photography becomes truly beautiful.